Configuring Voice and Sound
If you have trouble setting up speech recognition try heading over to the troubleshooting section. If that doesn't work drop into the gitter chat.
Setting up Speech Recognition
The smart mirror uses Sonus with Google Cloud Speech for keyword spotting and recognition. To set that up, you'll need to create a new project in the Cloud Platform Console:
- In the Cloud Platform Console, go to the Projects page and select or create a new project.
GO TO THE PROJECTS PAGE - Enable billing for your project.
ENABLE BILLING - Enable the Cloud Speech API.
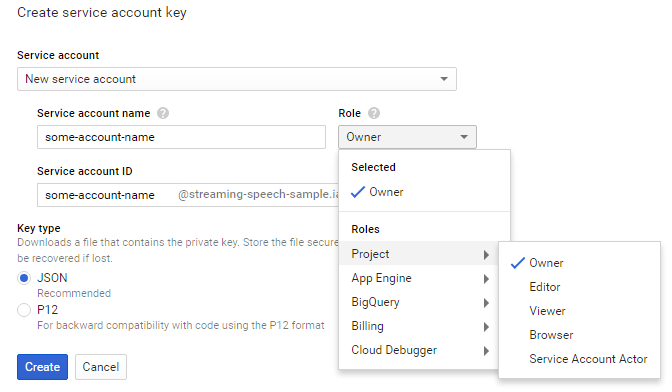
ENABLE THE API - For more info see Cloud Speech API Pricing (for normal smart mirror usage it will be free) - Create a new JSON service account key and download it to the
smart-mirrorfolder...
Credentials Guide: On Your Own Server.
When prompted to create a new service account select "Project Owner"
Keep this information for later. You'll need your projectID and keyfile to configure the smart mirror.
Audio input and output
If you run into issues configuring your audio see the Troubleshooting your Microphone and Speech Recognition issues section. To configure your USB microphone and audio output you'll want to determine your playback and recording devices.
First, you'll want to check the available playback devices
$ aplay -l
 **** List of PLAYBACK Hardware Devices ****
 card 0: ALSA [bcm2835 ALSA], device 0: bcm2835 ALSA [bcm2835 ALSA]
   Subdevices: 8/8
   Subdevice #0: subdevice #0
   Subdevice #1: subdevice #1
   Subdevice #2: subdevice #2
   Subdevice #3: subdevice #3
   Subdevice #4: subdevice #4
   Subdevice #5: subdevice #5
   Subdevice #6: subdevice #6
   Subdevice #7: subdevice #7
 card 0: ALSA [bcm2835 ALSA], device 1: bcm2835 ALSA [bcm2835 IEC958/HDMI]
   Subdevices: 1/1
   Subdevice #0: subdevice #0
Here the playback device is card 0, device 0, or hw:0,0 (hw:0,1 is HDMI audio out).
Then you'll want to determine the recording device:
$ arecord -l
**** List of CAPTURE Hardware Devices ****
card 1: Camera [Vimicro USB2.0 UVC Camera], device 0: USB Audio [USB Audio]
  Subdevices: 1/1
  Subdevice #0: subdevice #0
Here the recording device is card 1, device 0, or hw1:0.
And finally you'll want to replace the contents of your sound config file with nano ~/.asoundrc:
pcm.!default {
  type asym
   playback.pcm {
     type plug
     # This is your output device (In this case AUX out on the Pi)
     slave.pcm "hw:0,0"
   }
   capture.pcm {
     type plug
     # This is your input device (it may be different from what is seen here)
     slave.pcm "hw:1,0"
   }
}
Note: In order to push audio through the headphone jack, setting hw:0,0 is not enough. You must also run:
amixer cset numid=3 1
To force the audio back through HDMI you can run:
amixer cset numid=3 2
Train your own Keyword
Training your own keyword will drastically increase the accuracy of keyword detection. This will be most accurate if you do this on your Pi using the microphone that you'll be using to trigger the mirror.
From the smart mirror directory run:
npm run train-model
This command launches the snowboy site in embedded chromium.
Note: there is currently a snowboy bug that requires you to click the logo in the top left, login, close the window, and re-run the command
Or, you can train your model here: https://snowboy.kitt.ai/hotword/47
Once trained, download the model and save it to the root of the smart-mirror directory.